Physical Address
304 North Cardinal St.
Dorchester Center, MA 02124
Physical Address
304 North Cardinal St.
Dorchester Center, MA 02124

Compiling source code in Linux is an easy task. In this tutorial you'll learn how to get your system ready and the three steps needed to compile packages.
In the present days you can use Linux to its full potential without needing to know how to compile your own packages. Modern Linux package repositories have already precompiled software compatible with your distribution for most packages out there. So, if that’s the case then why do you need to know how to compile software in Linux at all?
The answer to the previous question is pretty simple: because compiling your own packages will allow you to get highly customized versions of these packages to better suit your needs. For example, if you install a webserver package like Nginx from the main repository, it will install a generic pre-configured version of Nginx compatible with your distribution. On the other hand, if you compile Nginx yourself you’ll be able not only to compile it with your own configuration flags customized to your own particular needs, but you’ll be able to enhance it by adding specialized modules like for example Google’s Pagespeed (an open source module developed by Google to speed up your server) or Fancyindex among many other extra modules.
In short, compiling your own software will not only help you to customize and enhance already existing packages in your distro’s repositories, but it will also help you to be able to install obscure packages for which there many not be any already pre-compiled packages in the repository.
If you’re looking for a more user friendly and easier way to install software, you can always use a Package Manager: An Introduction to Linux Packages and Package Managers.
Most packages will need certain tools already installed in your system in order to compile. This is not a big deal since the package creators will normally list all the needed software in the release notes. However, there are certain packages that are usually needed almost universally. These packages are:
gcc is the GNU Compiler Collection, a compiler system released by the GNU Project which supports compiling source code from various programming languages. It’s also a key component of the GNU toolchain and the standard compiler for most Linux packages. We aren’t going to install gcc directly, but instead we’ll install a toolbox which contain gcc along with many other useful compilation tools. Next we’ll list the standard toolbox for the most popular Linux distributions, choose which one to install accordingly to your own flavor of Linux.
build-essential is a package developed for Debian and its derivatives (Ubuntu, Mint, etc.) which contains a lot of the tools and packages needed to compile software (it includes gcc and g++).
Install it with:
sudo apt install build-essential
Other distros like CentOS or Red Hat don’t use the build-essential tools, but they have their own compilation tools suite. You can get an equivalent by installing the following tools:
sudo yum install gcc gcc-c++ kernel-devel make
base-devel is similar to the other two, a set of useful tools needed to compile most software you may find out there. You can install it with pacman:
sudo pacman -S --needed base-devel
You don’t really need to worry about installing tons of compilation tools, the ones mentioned above are usually all you need. If a package needs a special tool to be installed beforehand the code authors will (almost) always specify it. With that said, other tools frequently required by many packages are: pcre and pcre-devel.
Once you’ve installed the compiler the second step is getting the source code you want to compile. The source code or just source are the files with the instructions that the compiler will read and compile into binary code compatible with your Linux distribution and CPU architecture. There are many ways of getting source code, either by downloading it from the author’s website, cloning it from the author’s Github or Gitlab repo or actually pulling it from your distro’s main repository.
Yes, surprisingly to many people the distro’s repository doesn’t only contain pre-compiled packages, but it also can serve the source code of a package if you need it. This makes sense, remember what we’ve said at the beginning of this article about software compilation being a useful way of getting packages specially tailored to suit your own particular needs.
You need to clone the repo with the following command:
git clone https://github.com/path-to-the-repo
That command will download all the source code from the Github repository and store it in a directory with the project’s name. If you want git to place the source code in a another directory with a name of your own choosing just run the following command:
git clone https://github.com/path-to-the-repo custom-directory
Note: if you need to learn Git follow this link: Git tutorial: Version control from the ground up.
You can use your own package manager to do bring the source code of any package listed in your distro’s repository. Replace packagename for the name of the software package you’re looking for:
With apt
apt-get source packagename
With RPM and yum
You need to install a package called yum-utils and the use yumdownloader in order to download the source code:
sudo yum install yum-utils
yumdownloader --source packagename
With pacman
In Arch you need a package called abs (Arch Build System) in order to download the source code of the packages:
sudo pacman -S abs
sudo abs                     # this installs the ABS tree
sudo abs <packagename>
So far we’ve discussed how to prepare your system and getting the source code, now we’ll finally discuss how to compile the source code into a package. Compilation in Linux is a three steps process: configuration, compilation, installation.
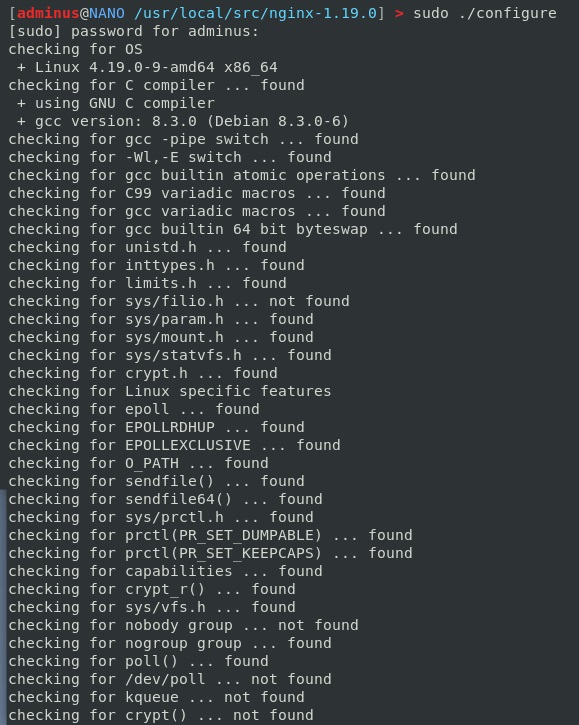
The source code you’ve downloaded in the previous steps nearly always comes with a configure script. All this script does is checking your Linux distribution in order to verify it has all the essential packages and tools needed for the source code to compile successfully and creating the Makefile. In order to execute the configure script go into the directory where your source code is located and run:
./configure
Important note: sudo it if your’re compiling the source code in a system directory like /usr/local/src/. In other words, if you get any errors during the configure step it’s either because you don’t have the necessary packages (see previous three steps) or because you don’t have the required permissions in the directory where you’re trying to compile the software, so sudo it:
sudo ./configure
If after sudoing your configure command the configure script is still throwing errors that means something is missing!. Read carefully the ./configure output and see if it’s asking for something you don’t have installed in your system. Then install it and run the configure script again.
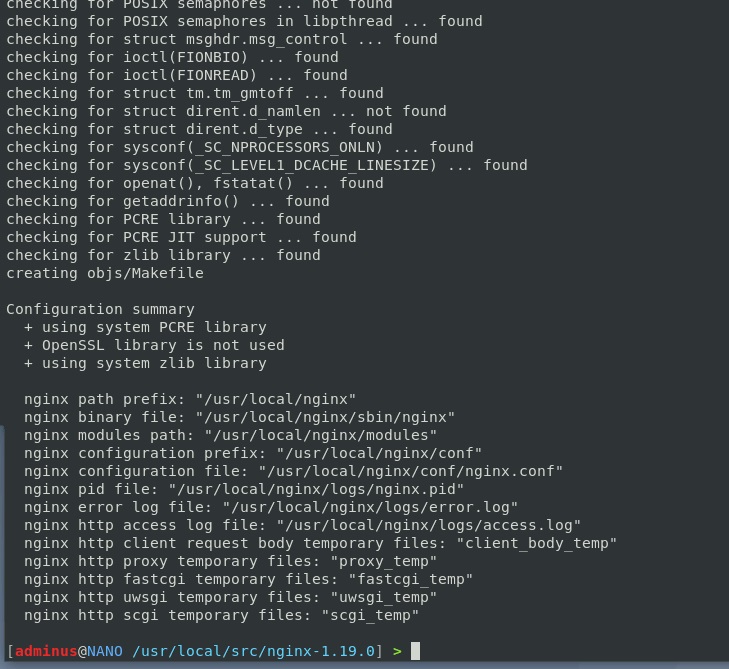
If the configuration script ends successfully, it will provide a configuration summary.


Note that you may pass different flags to the configure script in order to customize the package to your own needs. For example. if you want to compile your Nginx package to read from a configuration file located in /home/youruser/nginx.conf instead of the default configuration file located in /etc/nginx/nginx.conf, we can achieve that by passing a configuration flag:
sudo ./configure --conf-path=/home/youruser/nginx.conf
Usually the notes of the source code you’re trying to compile will have a list with all the flags available.
Flags are separated with spaces:
sudo ./configure --first-flag=value --second-flag=value
If your ./configure command was successful, that means it created a special file called the Makefile (just ls your source code directory and see if the file is there). The Makefile contains all the instructions to compile the package. If you’ve installed the previously mentioned build-essential (Debian, Ubuntu, Mint), kernel-devel (CentOS, Red Hat) or base-devel (Arch) package in your system, then you already have the tool needed to compile the makefile, an it’s called to no one’s surprise, make.
Run the make command:
sudo make
Note: you can run make without sudo if your user owns the directory and has access to the needed tools.
Have in mind that the make command may take some time depending on the size of the package you’re trying to compile. Don’t worry and just let it do its work.
Once executed basically all you’ll see is a long, long list of modules and other elements getting compiled.

If everything went OK now the package is ready to be installed. In order to achieve this you’ll need a third and last command, unlike the other two commands that may be run without sudoing them under certain circumstances, this third command needs to be sudoed.
sudo make install
That will install the package in your system, and once finished you’ll be able to use it as any other package installed in your system.