NFT Hydroponics for Home Gardeners: A Complete Guide
NFT hydroponics is an accessible and rewarding method for home gardeners to grow fresh produce and herbs. This guide and tutorial will teach you how to create your first NFT hydroponics setup at home, and then upgrade it in scale: Materials needed, assembly steps, crop types, and much more.
The Nutrient Film Technique (NFT) is a popular hydroponic method where a thin film of nutrient-rich water continuously flows over plant roots inside a channel or tube. The plant roots hang into the shallow stream, so the lower roots are bathed in nutrients and water while the upper roots are exposed to air for oxygen uptake. This constant access to water, nutrients, and oxygen leads to fast growth and efficient nutrient absorption in plants. NFT is favored by many hobbyist growers because of its simplicity, space efficiency, and water-saving recirculation of the nutrient solution. In short, NFT hydroponics allows home gardeners to grow more plants in less space with less water, all while delivering nutrients directly to the roots for optimal growth.
By understanding the basics of how NFT works and following best practices in setup (see below), automation, and troubleshooting, even beginners can achieve excellent results. Start small, keep an eye on your system’s health, and you’ll soon be harvesting crisp lettuce, fragrant basil, or even ripe strawberries right from your own NFT setup. Let’s go soilless!
The Edible Indoor Gardening
This article was written as a companion of the Edible Indoor Gardening Project, a system that combines hydroponics with other methods in order to grow a home garden inside your home, shed or garage.: The Ultimate Edible Indoor Garden Guide.
Building an NFT Hydroponic System at Home
One of the appeals of NFT for home gardeners is that you can build an effective system with simple materials. Below is a step-by-step guide to constructing a basic NFT setup and getting it running. This will cover both the initial build and tips for maintaining it over time.
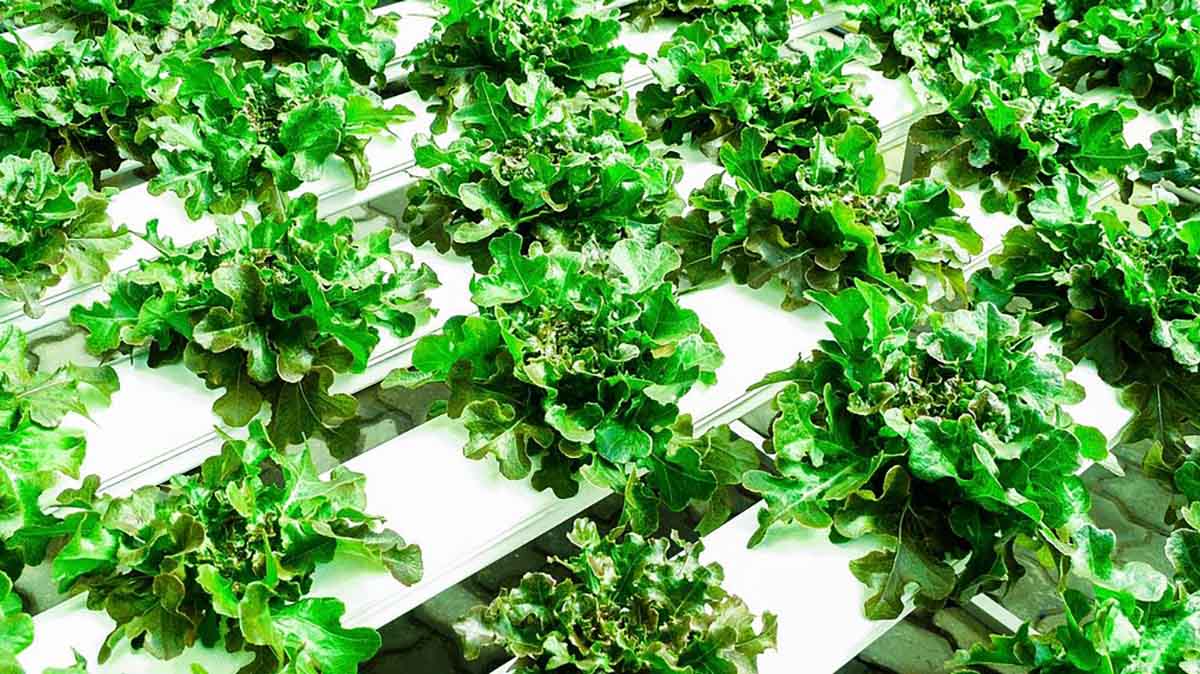
Photo of a basic horizontal NFT system growing leafy greens. Nutrient solution is pumped from a reservoir into the high end of each slightly tilted channel, flowing as a thin film past the roots and draining back into the reservoir. This continuous loop provides plants with a constant but shallow supply of water and nutrients, and plenty of root oxygen exposure to prevent suffocation or rot.
Materials Needed
Before starting, gather the following components for a DIY NFT system:
Growing Channels – Pipes or troughs for the nutrient flow. Common low-budget options include PVC pipes (usually 3–4 inch diameter) or rectangular vinyl rain gutters/downspouts. Ensure they are food-safe (uPVC or similar) and opaque to prevent algae growth. You’ll also need end caps for each channel to contain the flow.
Support Structure – A frame or stand to hold the channels at a slight incline. This can be a simple homemade wooden rack, a metal shelf, or any sturdy support that keeps one end of each channel a few inches or centimeters higher than the other to allow gravity drainage.
Reservoir – A tank or bucket to hold the nutrient solution. An opaque plastic tote or bin (10–20 gallons for a small setup) works well to keep light out (preventing algae). It should have a tight lid (with holes for tubing) to reduce evaporation and contamination.
Water Pump – A submersible pump to move nutrient solution from the reservoir up into the channels. Small pond or aquarium pumps are suitable for hobby systems. Choose a pump that can run continuously and deliver a steady but not overpowering flow (many hobbyists aim for around 1–2 liters per minute per channel in NFT).
Tubing and Fittings – Food-grade vinyl tubing to carry water from the pump to the channels, and fittings for the outlet if needed. Use opaque tubing (to inhibit algae) and ensure a snug, leak-proof fit between pump, channels, and return lines. Having a valve or clamp on the tubing can help adjust flow rate.
Net Pots and Grow Medium – Net pots (typically 2–3 inch diameter) to hold your plants in the channels. An inert grow medium like clay pebbles or coco coir goes in the net pot to support the plant roots. The medium should stay moist from the nutrient film to help young roots start growing into the flow.
Seedlings/Plants – Start seeds separately (in rockwool cubes, peat pellets, etc.) or use plant starts, then transplant them into the net pots for the NFT system once they have some root development.
Timer (optional) – A timer can automate the pump if you plan to run it in intervals rather than continuously. Not strictly required for NFT (many run the pump 24/7), but using a timer to cycle the pump on/off can save energy and prevent issues like overflow from root clogging.
Aeration (optional) – An aquarium air pump and air stone for the reservoir. NFT inherently provides good root oxygenation, so extra aeration isn’t always needed. However, if your nutrient flow tends to be deeper than a thin film (or if you use pump cycles with longer “off” times), an air stone in the reservoir can maintain high dissolved oxygen for root health.
Hydroponic Nutrients – A quality balanced nutrient concentrate formulated for hydroponics. These usually come in two or three-part solutions (to mix with water) providing all essential N-P-K and micronutrients. Make sure to get nutrients suitable for the crops you’ll grow (leafy greens vs. fruiting plants might use different formulations).
pH and EC Meters – Tools to monitor your nutrient solution. A pH test kit or digital pen is important for keeping the solution in the optimal pH range (typically ~5.5–6.5 for most plants). An EC/TDS meter is useful to measure nutrient concentration. Also have pH adjustment solutions (“pH Up” or “pH Down”) on hand to tweak the pH as needed.
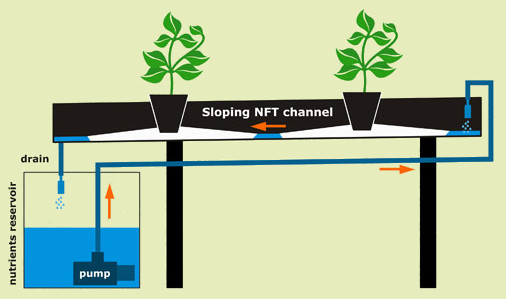
Basic diagram of a bare bones NFT hydroponics setup.
Assembly Steps
Once you have the materials, follow these steps to assemble and start your NFT system:
Prepare the Grow Channels: Decide how many channels (pipes) you will use and how long they will be. Mark and drill planting holes along each channel for the net pots. A hole saw bit matching the net pot size (e.g. ~3 inches (~7 cm) for 2-inch (5 cm) net pots) works well. Space the holes so plants have room to grow without crowding – typically 6–8 inches (15 or 20 cm) apart for lettuce or similar plants, adjusting spacing based on plant size. After drilling, cap the ends of each channel (one end cap may need a hole or fitting for drainage back to the reservoir). Rinse out any plastic debris.
Build the Frame and Layout: Set up your support structure in the desired location. Position the channels on the frame at a slight slope, roughly 1–3% grade (i.e. 1–3 inch (1.5 to 7.7 cm) drop per 100 inches (254 cm) of length) so that water will flow gently from the inlet end to the drain end. Ensure the channels are secure (use pipe clamps or straps if needed) and that the drain end is directly above the reservoir so nutrient solution can fall or trickle back into it. Check that all channels slope consistently without any dips where water could pool (which can cause uneven nutrient flow).
Install the Reservoir and Pump: Place the reservoir under the low end of the channels. Cut a length of tubing and attach it to your submersible pump. Put the pump in the reservoir (near the bottom) and run the tubing up to the high end of the channels. You can use a manifold or splitter if you need to feed multiple channels from one pump, or connect the tubing into a main header pipe that feeds all channels. Secure the tubing so it won’t pop out; many DIY setups simply run the tube into the channel through a small hole or notch at the top of the end cap. At the lower end of each channel, ensure there is a drain hole or fitting allowing water to trickle back into the reservoir (you can drill a small hole in the end cap or leave a gap). Do a quick dry fit: fill the reservoir with plain water and turn on the pump to test flow through the channels. Adjust the flow rate (using a valve or pump setting) so that a thin film of water runs along the bottom of each channel and returns to the reservoir without overflowing. If water is gushing and submerging the roots completely, dial it back; if only a few drops, increase it. A gentle flow that keeps the channel bottom wet is ideal – for example, research suggests about 8–10 ounces of solution per minute per channel can be sufficient for leafy greens.
Transplant Seedlings into the Channels: Once the system flow is tested, you can add plants. Place each seedling into a net pot with some grow medium (if it’s in a starter plug like rockwool, you can put the whole plug into the net pot). The roots or bottom of the starter plug should slightly protrude from the bottom of the net pot. Set the net pots into the holes in your channels. Ensure the bottoms of the net pots get wet from the nutrient film – this contact is critical in the first weeks so the young roots don’t dry out. If needed, top-up water onto the net pots or raise the reservoir temporarily to increase water level until roots grow out. As the plants develop longer roots, they will naturally hang into the flow.
Add Nutrient Solution: Mix your hydroponic nutrients into the reservoir water, following the product instructions for concentration. Use your EC/TDS meter to verify the strength is in the target range for your plants (for example, a mild nutrient EC ~1.0 is good for new transplants, later rising to ~1.5–2.0 for heavy-feeding plants like fruiting strawberries). Also measure and adjust the solution pH to ~5.5–6.5 (most hydroponic nutrients will acidify the water, so you may need a bit of “pH Up” base to bring it into range). Once the solution is prepared, turn on the pump and let the system circulate. Monitor the flow in each channel to be sure all net pot bottoms are getting wet and no areas are running dry or flooding.
Establish a Flow Schedule: Decide whether to run the pump continuously or on a cycle. Many home NFT systems run 24/7 to keep roots constantly fed (and because the shallow flow naturally oxygenates the roots). Others prefer an intermittent schedule to give roots periodic air exposure and to reduce risk of overflow if roots clog the channel. For example, one approach is running the pump for ~2 minutes every 15–20 minutes. This on/off cycling still provides plenty of nutrients and oxygen but also lets the root zone drain briefly, which can help if you notice overly wet roots or any signs of waterlogging. If using a timer, start with short, frequent cycles (as above) and adjust as needed based on plant health. Make sure any timer you use can handle your pump’s power load.
Maintain and Monitor: With the system up and running, develop a routine to keep it in top shape (more detailed maintenance tips are below). In the first week, watch the plants closely as they adapt – it’s normal if they grow roots first before a lot of new leaves. Check the reservoir daily to ensure the pump is operating and the solution level is sufficient. It’s a good practice to check pH and nutrient levels at least a couple times a week and top off the reservoir with fresh water or nutrient solution as needed.
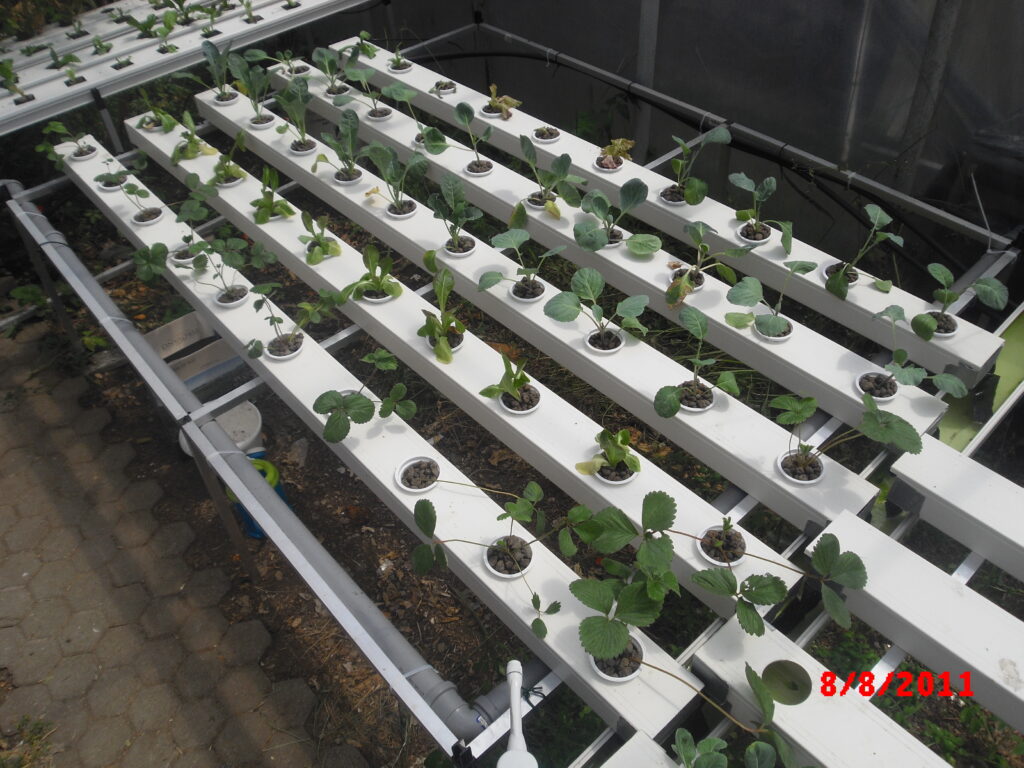
Nutrient Film Technique hydroponic growing. Once you get your first stack going, nothing is stopping you from keep adding more stacks into the loop. Eventually you’ll increase the system into a relatively big crop system.
DIY vs. Professional NFT Systems
NFT hydroponics can be built on a shoestring budget or purchased as a ready-made kit. Each approach has its pros and cons. A do-it-yourself setup often uses repurposed materials (like rain gutters or PVC pipes) and will be the cheapest route. In contrast, hobby-grade commercial systems or kits come with specialized channels, fittings, and instructions, at a higher cost. Below is a comparison of low-budget DIY vs. store-bought NFT systems:
Aspect
DIY/Low-Budget NFT Setup
Off-the-Shelf Hobby NFT Kit
Cost
Low cost – often uses affordable materials (PVC pipes, buckets, etc.). Overall cost can be a fraction of commercial systems, though it varies by design.
Higher cost – paying for pre-made channels, stands, and branded components. Kits often range from modest (~$100–$300) for small units to more for larger setups. (prices may vary, these supplies really are affected by cyclic phenomena and international events)
Materials & Design
Uses generic parts: e.g. PVC or vinyl gutter channels, homemade frames, aquarium pump, basic timer. Design is fully customizable to your space and needs.
Uses purpose-built components: e.g. food-grade NFT channels with removable lids for easy cleaning, custom end caps with hose fittings, pre-sized reservoir and pump. Design is optimized by manufacturer but less flexible to modify.
Assembly Effort
Requires hands-on work: measuring, cutting, drilling, and sealing. DIY builders need some tools and creativity to put everything together. Instructions are self-guided (or from online tutorials).
Easy assembly: kits come with instructions and pre-fit parts, making setup more plug-and-play. Little to no drilling required; ideal for those less comfortable with DIY handiwork.
Maintenance
May need more manual checking: DIY parts (e.g. homemade seals or fittings) might leak if not done right, and cleaning inside round PVC pipes can be a bit tricky (no access lids). However, replacement parts are cheap and widely available.
Designed for convenience: channels with lids and standardized parts simplify cleaning and part replacement. Pumps and timers are often well-matched to the system. Fewer leaks if assembled as directed. The trade-off is needing to get specific parts from the manufacturer for expansion or fixes.
Scalability & Expansion
Very flexible – you can add more pipes, upgrade the pump, or reconfigure the layout as you learn. DIY systems can be expanded at low cost, but you’ll rely on your own design improvements.
Modular options – some kits allow adding extra layers or connecting multiple units, but expansion may require buying additional proprietary modules. The scalability is planned but comes at kit prices.
In summary, DIY NFT systems are budget-friendly and adaptable – great for tinkerers willing to get hands-on. Professional kits offer convenience and polished design, which can save time and reduce guesswork for beginners with a bigger budget. Both can yield excellent results; many home growers start DIY to learn the ropes, then upgrade certain parts (like switching to professional NFT channels or better pumps) over time as needed.
Top Crops for NFT Systems (and Tips for Each)
NFT hydroponics works best for fast-growing, relatively small plants that don’t have huge root systems. Here are some ideal crops for NFT and tips to help them thrive:
Lettuce & Leafy Greens: Lettuce is one of the most common NFT crops and for good reason – it has shallow roots, grows quickly, and thrives with constant nutrient access. Varieties like leaf lettuce, bibb, and romaine do very well. Keep nutrient solution temperature on the cooler side if possible (around 65–70 °F) to prevent issues like tip burn. Greens generally prefer a mild nutrient strength; they don’t need very high EC. Stagger plantings a couple of weeks apart if you want continuous harvests rather than a glut all at once. Other leafy greens such as spinach, arugula, bok choy, and kale can also be grown in NFT with similar care. These plants all appreciate the ample moisture and aeration NFT provides and can go from transplant to harvest in just a few weeks.
Basil & Culinary Herbs: Herbs like basil, mint, cilantro, dill, and parsley flourish in NFT systems. They enjoy the constant supply of water and nutrients, which promotes lush foliage and strong aroma in the leaves. Basil in particular grows vigorously – you can continually prune/harvest the tops to encourage bushier growth and prevent it from getting too tall or flowering (which can reduce flavor). Most herbs do well with a moderate nutrient level (EC around 1.0–1.4) and standard hydroponic pH (~6.0). One tip for herbs is to support taller varieties (like dill) with a small stake if needed, since NFT doesn’t provide much media to anchor them. Also, keep an eye on mint’s roots – mint is fast-growing and can send lots of roots down the channel, so you might occasionally trim back excessive roots to avoid clogging.
Strawberries: Strawberries are a favorite fruiting plant for NFT, grown both by hobbyists and in commercial setups. They have relatively compact roots and benefit from the oxygen-rich, flowing nutrients. When growing strawberries, it’s common to start with bare-root runners or plugs rather than seeds (this gives you a head start on growth). Place the young strawberry plant in a net pot with clay pebbles, and be sure the crown (the stem base) stays just above the wet surface to prevent rot. Strawberries like a slightly weaker nutrient solution at first – start around EC 0.8–1.0 while the plants establish, then increase to ~1.5 as they grow, switching to a “bloom” or fruiting formula once they begin to flower. Pollination is key if you’re growing indoors: gently shake flowering plants or use a soft brush to pollinate, since there are no bees inside. Also, prune off any runners (unless you want to propagate new plants) so the energy goes into fruit production. With good light (strawberries love full sun or strong artificial light) and the steady feeding from NFT, you can expect sweet, juicy berries. Keep nutrient temperature and oxygen in check – warm, stagnant water can hurt strawberries, so an aerated, circulating NFT system is ideal.
Other plants: Many other crops can work in NFT. Green onions, radishes, and celery are shallow-rooted and do well. Tomatoes and peppers are generally grown in deeper systems due to larger roots, but dwrarf or compact tomatoes and young pepper plants have been grown in NFT channels by experienced hobbyists. If trying bigger plants, use larger channels and be prepared for more maintenance. In general, start with the easy, quick crops above before experimenting with larger ones. Thee the Edible Indoor Gardening guide for more ideas.
Nutrition
For more information about nutrition (which is a great way to decide which crops you actually want to grow in your NFT hydro setup), you can also learn about vitamins, essential minerals, electrolytes and key nutrients following our Nutrition Reference Sheets series:
One advantage of a home NFT setup is that it can be enhanced with simple automation to make your life easier and improve consistency. Here are some ways to add automation or monitoring to your NFT system:
Pump Timers: As mentioned, using an interval timer for your pump is optional but can be beneficial. A timer will automatically turn the pump on and off at set intervals, so you don’t have to remember to do it manually. This can save electricity and potentially improve root aeration if you dial in the right cycle. For example, you might start with 15 minutes on, 15 minutes off, and observe plant health. Some hobbyists run the pump 24/7 and only use a timer to shut it off for a few hours at night; others do short frequent cycles around the clock. Ensure any timer is rated for the pump’s power (especially for larger pumps) to avoid electrical issues. If you go away on vacation, a timer (along with an auto-top-off system) can keep things running smoothly in your absence.
Grow Lights & Lighting Schedules: If you’re growing indoors or extending daylight, LED grow lights are your plants’ best friend. These should be on a timer as well, to give plants a consistent day/night cycle. Most leafy greens and herbs do well with 14–16 hours of light per day. Using a simple outlet timer, you can set the lights to turn on in the morning and off at night. Position lights 6–12 inches (15 to 30 cm) above the plants (distance varies by light strength) and adjust as plants grow. Good lighting with timers ensures robust growth and also prevents issues like leggy, weak plants that can occur if light is inadequate.
Nutrient Dosing Automation: In a basic NFT system, you’ll likely mix nutrients by hand and top up the reservoir yourself. However, for those who love tech, there are automated dosing systems available. These are devices with peristaltic pumps that can add pH adjusters or nutrient concentrates from stock bottles into your reservoir under the control of sensors or a microcontroller. High-end hobby kits or DIY Arduino/Raspberry Pi projects can monitor pH and EC and dose small amounts of acid, base, or nutrient to keep levels steady. This is more of a luxury than a necessity for a home grower – many are content with weekly manual adjustments – but it showcases how technology can manage the nutrient balance. Even without automatic dosing, consider using a float valve or similar to automatically add water to the reservoir from a larger water supply if you’ll be away, to prevent the nutrient level from dropping too low.
Monitoring & Alerts: Keeping an eye on system conditions can prevent problems. Basic tools include a digital thermometer for water temperature (optimal range ~18–22 °C for most plants), a pH meter, and an EC/TDS meter. For convenience, there are combo meters that stay in the reservoir to continuously display readings, or even smart sensors that sync to your phone. Monitoring ensures you catch issues early – for instance, if you see the nutrient EC dropping, that means plants are feeding and you might need to add nutrients; if pH drifts out of range, you can correct it before plants show deficiency symptoms. Some growers set up webcams or DIY electronics (like a Raspberry Pi with a camera or water level sensor) to get alerts if the pump fails or the reservoir is low. While not required, these tools are part of the fun for tech-savvy hobbyists and add a safety net. In fact, innovations in smart hydroponics are making it easier to remotely monitor and control home systems – but even a simple NFT setup can be managed with just a timer and your own periodic inspections.
Troubleshooting Common Issues
Even well-built NFT systems can encounter problems. Here’s how to recognize and address some common issues in NFT hydroponics:
Clogging in Channels or Tubes: A frequent issue in NFT is the blockage of flow, often caused by roots growing too long or debris/algae buildup. If you notice water backing up, overflowing a channel, or certain plants not getting water, suspect a clog. Roots can clog outlet holes or tubing, especially from larger or older plants (tomato roots, for example, can be quite invasive). Also, algae or undissolved nutrient sediments can accumulate and slow the flow. To fix clogs, first gently remove any root masses obstructing the channel drains or pump inlet. Prune back excessive roots if a particular plant is taking over the channel (most plants handle a root trim fine, especially if done periodically). Check that your pump’s pre-filter (if it has one) isn’t choked with debris. Flushing the channels with clean water can help clear gunk. To prevent clogs, ensure your system has: opaque channels (to minimize algae), a mesh filter on the pump intake, and reasonable plant spacing. Using shorter channel lengths or adding additional drain points can also help if you have many plants. Running the pump on a timer (short on cycles) as mentioned earlier can mitigate overflow risk even if minor clogs occur. In summary, regular inspection and a bit of root pruning will keep the nutrient film flowing freely.
Nutrient Imbalances: If plants show signs of nutrient deficiencies (yellowing leaves, poor growth) or toxicities (leaf burn, nutrient crusting), the cause is likely an imbalance in the solution. NFT’s constant flow usually provides a steady supply of nutrients, reducing deficiencies, but things can still go wrong. Check the solution strength (EC) – it may have become too diluted (if you only added water for a while) or too concentrated (from evaporation). Adjust by adding more nutrient or diluting with water to reach the target range for your crop. Check pH as well; an off-range pH can lock out nutrients even if they are present. Keep pH in the recommended 5.5–6.5 range to avoid precipitation or nutrient lock-out issues. It’s wise to dump and replace the reservoir solution entirely every few weeks for a fresh reset, as this prevents any one nutrient from accumulating to excess or running fully depleted. Also be sure you’re using a complete hydroponic nutrient formula – using something like regular fertilizer or the wrong proportions can cause imbalances and even clog pumps with undissolved salts. In short, maintain your solution by periodic testing and renewing, and your plants should stay green and vigorous.
Root Rot: This is a grower’s nightmare – healthy white roots turning brown, slimy, and foul-smelling. In NFT, root rot can happen quickly if the pump fails (drying out roots) or if oxygen levels drop in warm, stagnant water. The fungus often causes root rot in hydroponics when conditions favor it. Signs include browning roots that easily slough off, and plants wilting even though water is available. Prevention is key: keep the nutrient solution oxygenated and cool. NFT inherently gives roots access to air, but ensure the film isn’t too deep; if you see channels filling up, add aeration or reduce flow. Using an air stone in the reservoir can help boost oxygen, especially in warmer weather. Try to keep solution temps under ~75 °F (24 °C) – warm water holds less oxygen and speeds pathogen growth. If you do encounter root rot, act fast: remove affected plants immediately (they likely won’t recover to full health, and they can spread disease). Clean the system and consider sanitizing with a hydrogen peroxide solution to kill microbes. Some growers use beneficial microbes (like hydroponic-specific beneficial bacteria) as a preventative to outcompete root rot organisms. Also, never let the pump be off for too long – remember, in NFT, a power outage or pump failure can dry out roots within hours on a hot day. Consider a battery backup or at least an alarm if power is lost. Some advanced setups integrate an automated alert system – for instance, a sensor that texts your phone if the water flow stops. At a simpler level, just check your system at least once daily. The good news is that pump failures are not common with quality equipment, and with prompt action you can often save the plants if it does happen.
Pump or Power Failures: Since NFT relies on an active pump, any failure can threaten your plants. If the pump stops, the nutrient film stops flowing. The thin moisture film on the roots will dry out faster than in other systems (like deep water culture), so you have less grace time. To troubleshoot a pump failure: first, if it’s a power issue (tripped breaker, unplugged cord), resolve that and get it running ASAP. If the pump itself died, you’ll need to replace it – this is why having a spare pump on hand is a good idea for serious growers. In the meantime, you can hand-water the channels periodically (pour nutrient solution gently into each channel every few hours) to keep roots moist. Prevention measures include using a reliable pump rated for continuous use, adding a float switch or sensor that can alert you if water isn’t flowing, and possibly installing a backup power source if you live in an area with frequent outages. Some advanced setups integrate an automated alert system – for instance, a sensor that texts your phone if the water flow stops. At a simpler level, just check your system at least once daily. The dependency on technology means malfunctions can disrupt the entire system quickly, so vigilance is important. The good news is that pump failures are not common with quality equipment, and with prompt action you can often save the plants if it does happen.